Sometimes your tractor tyres can be repaired, but not systematically and for certain damages replacement is inevitable. Cold repairs are the cheapest solution and the quickest, yet you cannot systematically choose this option with the idea of saving money, because in certain cases repairs necessitate a patch and hot vulcanisation requiring more equipment and a higher cost whilst in other cases reparation is simply not an option, because it won’t last or worse even, it may put your safety at risk. In this case it is more prudent to replace the damaged tyre.
To carry out lasting cold repairs you must be sure that the conditions are right. Everything will be explained in this article:
1. Why cold repairs are not always an option
This type of repair is certainly the simplest to carry out, but is not always suitable for all the different areas of an agricultural tyre, which is continuously moving and must withstand considerable strain:
- working at low pressure for several hours in a row,
- resistance to load, or cyclic loads during harvesting for example,
- driving on all types of ground, etc
Cold repairs involve a sticking operation which cannot give the same result when used on the 3 distinct principal parts of the tyre:
- the tread, which is the area which must withstand direct contact with the ground,
- the sidewalls which must provide flexibility,
- the bead which is the link between tyre and rim.
Each of these parts is the result of an assembly of different materials and will not react in the same way to repairs.
1. The sidewalls are the most fragile area
The role of the sidewalls is to provide as much suppleness as possible while maintaining lateral stability. They absorb shocks and undergo considerable deflections to withstand the load or work at low pressure. This deflection ability limits cold repairs on this part of the tyre because the repeated flexion and deflection movements mean that repair patches which are not firmly fixed to the original rubber tend to peel off.
Only repairs using a patch and hot vulcanisation can survive in this very supple part of the tyre.
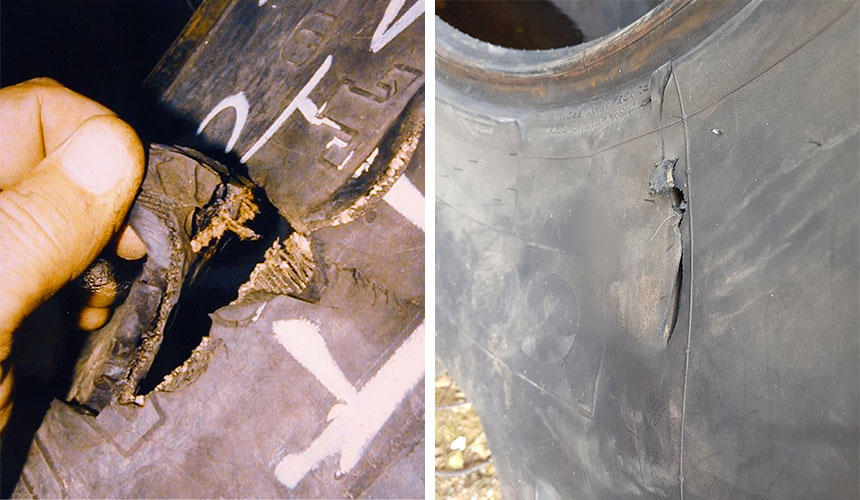 Cut in the sidewall which can only be repaired using a hot vulcanisation process
2. You have driven with a flat tyre
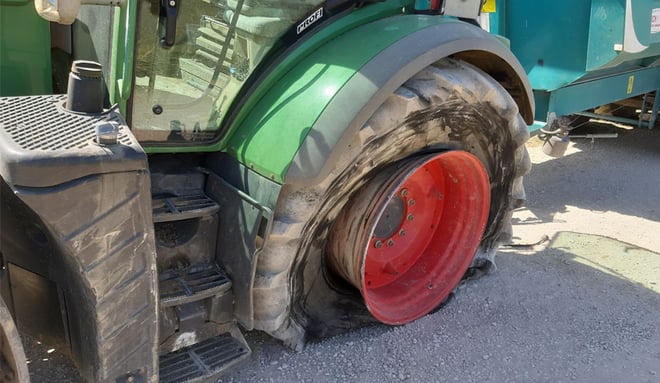
You knew you had a puncture, but you were obliged to drive with this slow puncture or with pressure that is really too low and you see marbling on the outside sidewall of the tyre. The tyre cannot be repaired because driving on a flat tyre seriously weakens the casing ply leading to a high risk of explosion when you increase inflation pressure. Repairing the puncture will not fix the problem, because after driving with a flat tyre, the entire casing becomes fragile.
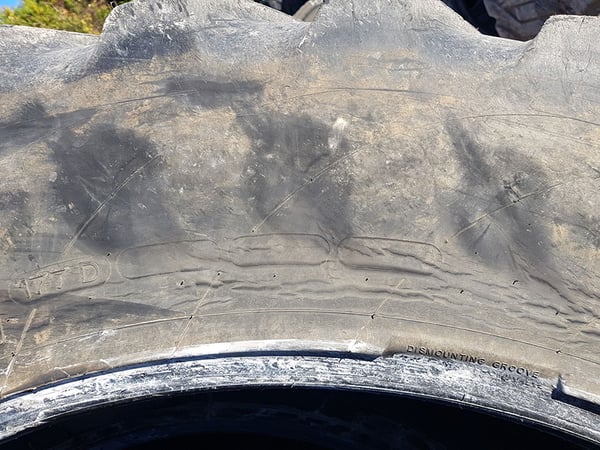 Unrepairable tyre due to driving with a flat tyre
3. Tyre with a break in the casing linked to an impact
Wherever the break in the casing is, cold repairs will not guarantee the tyre’s extended lifespan.
There may not be a strong enough bond with the tyre’s rubber with this type of repair which could peel off as a result of the extreme demands imposed on the tyre: load, working at low inflation pressure, speed…
Only hot vulcanisation is suitable for this type of break and only if the break is located in the centre of the sidewall, the top of the sidewall or on the tread.
If the tear is too large, covers too much of the structure or is close to the bead, it is better to replace the tyre.
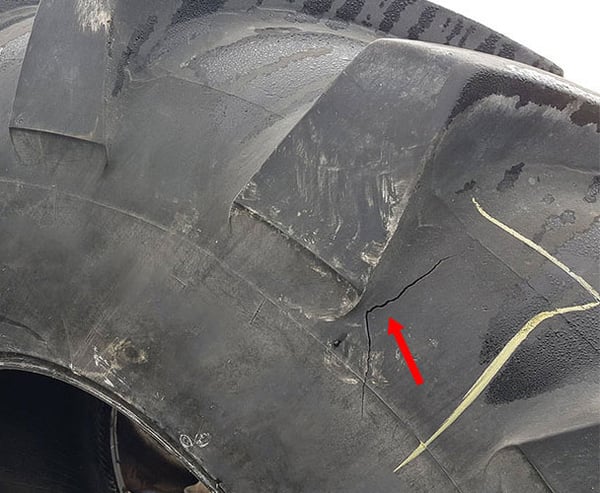 Break in the casing linked to an impact
which can only be repaired using a hot vulcanisation process
2. When are cold repairs the best solution?
Cold repairs are perfect for small-scale punctures, only in the tread area, when you can easily identify the sharp object which made the hole (nail, screw, metal object or tool, branch, etc.).
You can choose to proceed with cold repairs if you notice the puncture while you are working or if the tyre has deflated during the night, for example.
You must imperatively avoid driving on the flat tyre or leaving it for several days, which would alter the internal structure of the casing and make the repair ineffective because the deflection of the tyre would lead to other problems.
Why can repairs be carried out on the tread area?
The tread is the most resistant part of the tyre. It is made up of a thicker layer of rubber and numerous stabilising plies on top of the plies which protect the casing.
These are different superimposed layers of fibres and rubber which make the tyre resistant to shocks, ensure stability and driving precision.
Cold repairs on a puncture in this solid area, which is less flexible than the sidewalls, are generally very effective and alter neither the characteristics of the tyre nor its lifespan.
 Puncture on the tread caused by a dear antler
Beware: cold repairs are only recommended when the puncture is linked to a perforation, because the internal structure has not undergone any major damage.
Be sure to distinguish between a perforation and a cut which has opened up several layers of fibres creating a structural weakness which, in this case, must be repaired with a patch and hot vulcanisation.
3. Cold repairs for tyres with an innerliner
For a tyre with an innerliner, it’s the airtightness of the innerliner which is important, so you will have to dismount the tyre to repair the innerliner directly with a patch, the standard way.
This costs practically nothing, but to do it yourself, you will need a few hours to dismount and remount the tyre.
Once you have deflated the tyre completely, you will have to dismount it, then remove it from the rim to take out the innerliner, find the leak and repair it with a patch and liquid tyre sealant, to ensure perfect bonding of the patch with the innerliner.
To avoid nasty surprises, it’s often simplest to just change the innerliner, which is not a costly operation. It’s always better than having to do it again if there is a further leak. With a new innerliner you can be sure that the problem is fixed once and for all.
Innerliners deteriorate with time and use and handling them may cause micro-leaks, leading to loss of pressure and therefore further dismounting of the tyre if a replacement is necessary.
4. Repairing tubeless tyres (without innerliner) from the outside
There is a rapid, temporary solution for carrying out repairs directly on-site, if you can locate the puncture accurately because you can see the object or nail stuck in your tyre.
This solution is only suitable for tubeless tyres and on no account can be used to repair a tyre with an innerliner.
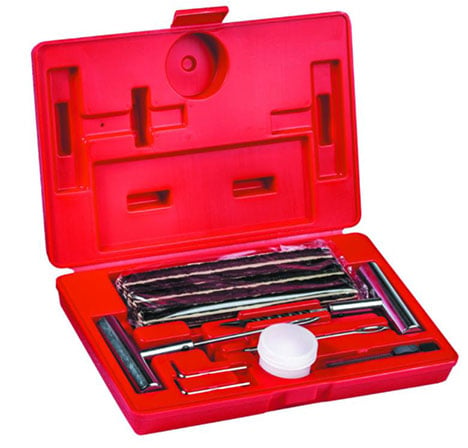 External wick repair kit
You will need an external wick repair kit that can be used without dismounting the tyre for a rapid repair solution.
- When you have identified the object which perforated your tyre, put the tractor on chocks deflate the tyre, then remove the protruding object.
- Using the reamer from the repair kit, enlarge the hole slightly so that you can insert the rubber wick.
- You can then thread the wick into the hole using the insertion tool.
This type of repair is not a long-term solution but will allow you to finish the job or return to the farm following repairs which should take around 15 to 20 minutes.
Beware, this is just a temporary fix as you have no idea of the tyre’s internal damage, which may be much greater than appears from the outside. It is therefore essential to carry out repairs internally using a mushroom plug type repair kit, having removed the tyre.
5. Repairing tubeless tyres (without innerliner) from the inside
Mushroom plug repairs, having first dismounted the tyre
For this type of repair, you must buy a "Mushroom plug kit" which is used to plug the puncture hole with a rubber mushroom plug adapted to the size of the hole.
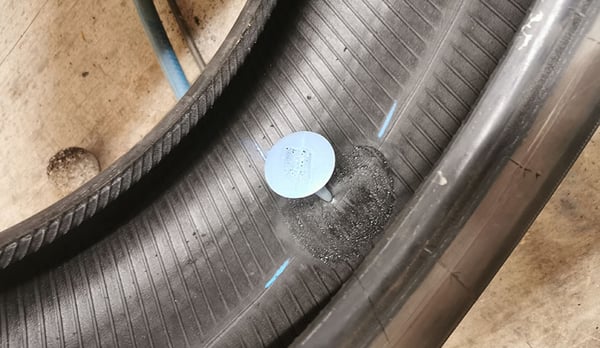 Mushroom plug for internal tyre repair
- Begin by removing the foreign body completely.
- Then use the tools supplied in the kit to make the hole slightly bigger: drill through the hole so that you can insert the mushroom plug from the inside.
There are several sizes of mushroom plug to fit the exact dimension of the hole that you have cleaned. - In the kit you have a cold vulcanisation sealant to ensure that the mushroom plug is airtight.
You will need to sand the innerliner over the entire area where it is contact with the base of the mushroom to ensure complete airtightness between the mushroom plug and the tyre’s innerliner. - You can insert it from the inside then pull it from the outside of the tyre and plane down the excess rubber on the surface of the tread.
Repair with a patch and cold vulcanisation
If you don’t have a mushroom plug you can also use a patch with cold vulcanisation for holes of around 1 cm, a little larger, but still only on the tread.
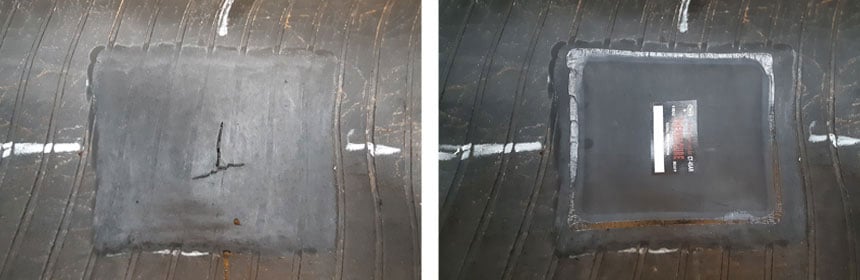 Repair with a patch and cold vulcanisation
However, carrying out this type of operation demands meticulous care: cleaning the butyl, high quality vulcanising solution, careful placing of the patch. Otherwise the patch will peel off and the repairs will have to be redone.
6. The simplest repair: at your usual tyre dealer
The most professional solution is to dismount the flat tyre, leave it on the rim and take it directly to your usual tyre dealer so that he can do the repair job for you.
He will know if cold repairs are suitable for your tyre or if a hot vulcanisation process is required. What’s more, he generally has all the equipment necessary to carry out this type of repair in about fifteen minutes, without counting the dismounting, remounting and transport of the tyre which you will need to do yourself.
To learn more about ways to increase your farm’s productivity, bridgestone-agriculture has created a comprehensive eBook on the topic which is available for you to download for free:
Bridgestone-agriculture Blog is written and administered by tractor tyre experts who are available to provide you with advice on agricultural tyres. They will help you to maximise your productivity with information on all things relating to tyres: inexpensive tractor tyres, technical data for agricultural tyres, solutions for avoiding soil compaction, sprayer tyre pressure, why and how to ballast your tractor tyres, when to use dual-wheels, the mechanical causes for abnormal wear, discounted agricultural tyres, etc...
Most people who read this article have also read some of the following articles:
- 10 tips to reduce abnormal wear to your farming tyres
- Agricultural tyres: +37% wear due to misalignment
- The worst consequences linked to used tractor tyres on your soils
- Why do my front tractor tyres wear much quicker?
- How to limit agricultural tyre wear faced with heavy loads
- When does a split make it necessary to replace your tractor tyres?
- Repairing tractor tyres: the techniques for each situation
DOWNLOAD FOR FREE
Increase the profitability of your operation: eBook on the essential role of tyre in cost saving